.jpg)
Lightroom Preset Packs & Instructions
- Stephen Knight
- Mar 30, 2025
- 7 min read
Updated: Sep 26, 2025
If you have landed on this page after purchasing one of my Lightroom preset packs - thank you for purchasing. This article will help make the most out of these presets. If you have yet to purchase, please keep reading.


Lightroom presets are a starting point for further post processing, so to make the most of these premium presets from Stephen Knight Photography, please read the instructions for each preset. These professional quality presets (.xmp files) are designed for photographers capturing photos in RAW file format, and post processing in Lightroom, Lightroom Classic, or Lightroom Mobile. Some of the presets, notably Classic Film presets will also work well for post processing smartphone .jpeg files in the aforementioned applications.
Preset packs currently available are:
How to install
To install these presets in Lightroom Classic:
Download zipped files.
Open Lightroom Develop pane.
Click on "+" icon on Preset tab.
Click on Import Presets, choose file path to download files. (Unzip should happen automatically).
The presets are .xmp files. They have been created and tested in Lightroom Classic, and will work in all recent Lightroom versions. Please contact me if you have any issues with these presets.
Lightroom Preset Pack - Light Painting
This preset pack contains the 4 Lightroom presets that I regularly use for light painting and long exposure night photography. In fact, it might be the only professional quality Lightroom preset pack designed for light painting photographers! I've also added 2 bonus brushes to this pack.

The Light Painting presets include:
Light Painting Standard SK_Light_Painting_Standard.xmp - preset designed for photos with light trails created using white light flashlights/torches.
Light Painting RGB SK_Light_Painting_RGB.xmp - preset designed for photos with light trails created using RGB flashlights/torches.
Urbex Illumination SK_Urbex_Illumination.xmp - base preset I use for urbex photography where I illuminate scenes with static warm and cool white lighting. This preset also works well for illuminating many other night scenes.
Black Fiber Optic RGB SK_BlackFiberOptic_RGB.xmp - this is the base preset that I use for creating RGB black fiber optic portraits with the Ants on a Melon RGB Critter 2.0 and RGB Critter BT flashlights. This is based on a photographic exposure of f/5.6 and ISO400, with the Critter's 'Full Spectrum Fade mode'. Other RGB Critter preset modes may require an adjustment to white balance to suit the colours. This preset should also work well with other RGB flashlights.
I have set the preset exposure to -1 to +2 depending on the preset, and you will need to adjust this to suit your photographic exposure (I always underexpose to avoid any highlight clipping, which then requires recovering the exposure in post processing). White balance is also set to "As Shot" so you may need to adjust temperature and tint depending on your camera's white balance settings (I always shoot with auto white balance). Photos taken with RGB flashlights often need an increase in temperature towards the warmer end of the scale.
I have added two bonus brushes to this pack. These will only work in Lightroom Classic:
Model Enhance Brush SK_LP_Model_Enhance.lrtemplate - light painting portraits using RGB flashlights can add a colour cast (usually magenta or red) to the model. The Model Enhance brush is used to paint over the model, adds skin smoothing, an increase in exposure, a decrease in saturation, and cooler white balance. You may need to adjust the these settings to suit your particular light painting scene. For example using a non-RGB flashlight may introduce a green colour cast, which requires a tint adjustments towards magenta.
Light Trail Enhance Brush SK_LP_Light_Trail_Enhance.lrtemplate - as light painting tools usually have a flashlight/torch at one end, the light trails can be uneven in brightness. The Light Trail Enhance brush can be used to brighten up the darker end of the light trails.
To install these brushes, unzip the downloaded folder, and copy the .lrtemplate file to Lightroom Classic's template folder. On Windows, this is usually C:\Users\<username>\AppData\Roaming\Adobe\Lightroom\Local Adjustment Presets and on a Mac is /Users/<username>/Library/Application Support/Adobe/Lightroom/Local Adjustment Presets

Lightroom Preset Pack - Classic Film
This Lightroom Preset pack contains a modern contemporary take on 6 classic or vintage film stocks. These presets contain the colour science behind each film type, but without added grain or other settings that degrade digital images. I frequently use these presets for portrait, landscape, or cityscape photography. Whilst these are designed for use with RAW files, I have also had success using them to postprocess smart phone .jpeg files.
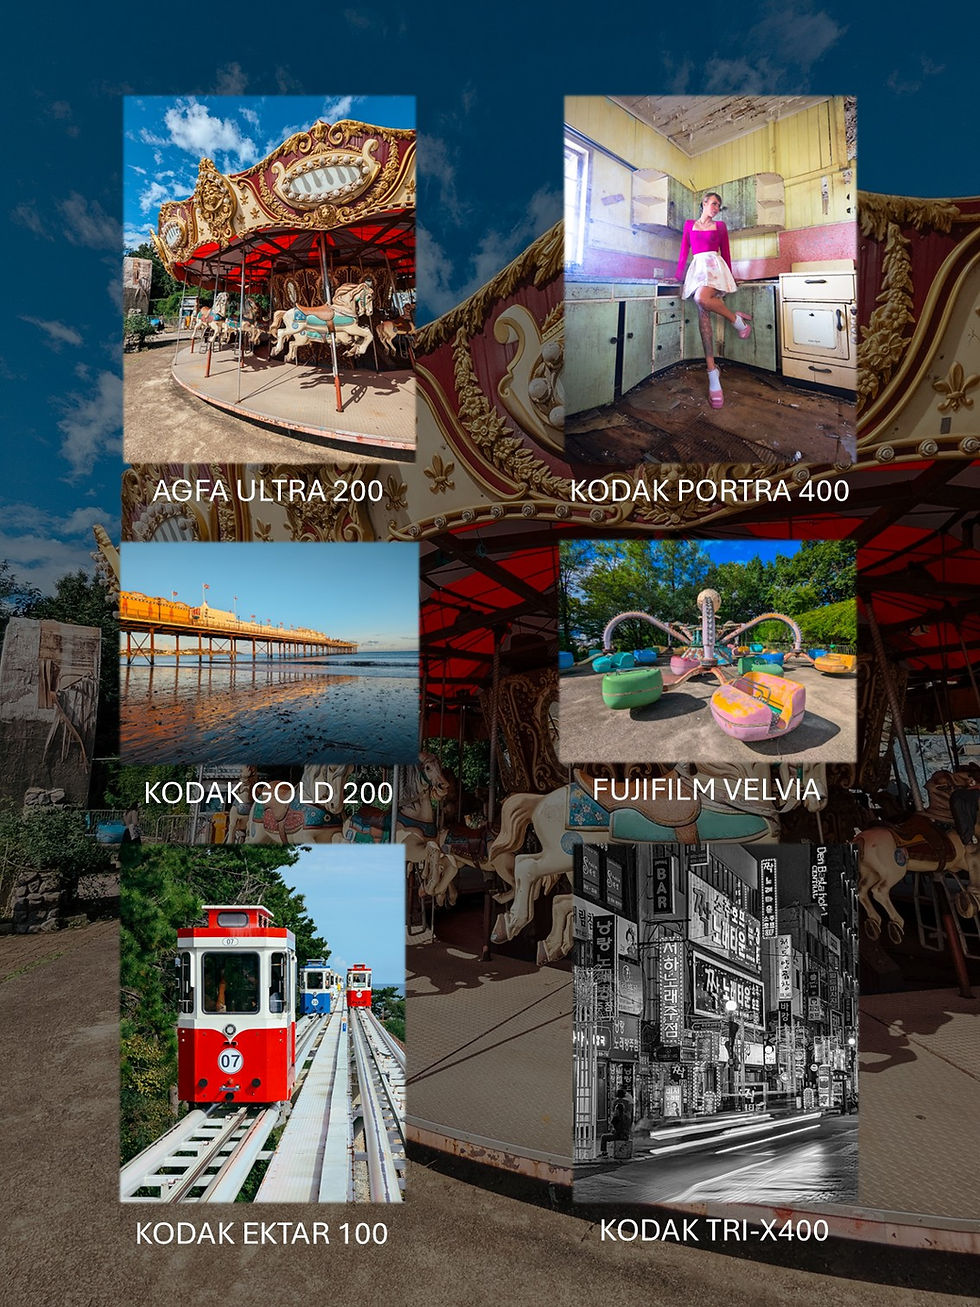
The Classic Film presets include:
Fuji Velvia SK_Fuji_Velvia_Clean.xmp
Kodak Portra 400 SK_Kodak_Portra400_Clean.xmp
Agfa Ultra 200 SK_Agfa_Ultra200_Clean.xmp
Kodak Ektar 100 SK_Kodak_Ektar100_Clean.xmp
Kodak Gold 200 SK_Kodak_Gold200_Clean.xmp
Kodak Tri-X400 SK_Kodak_TriX400_Clean.xmp
This popular preset pack is useful for portrait, landscape, and travel photography - with 80s, 90s, and early 00s vibes. They mimic the saturated and vivid Fujifilm Velvia, or timeless and classic Kodak Portra 400, Agfa Ultra 200, Kodak Ektar 100, and Kodak Gold 200 film stocks. The vintage Kodak Tri-X 400 monochrome film type is also included. These presets include the tone curve, color mixer, and calibration settings required to achieve the colour science behind these film looks. Settings such as white balance (I recommend shooting with auto white balance), exposure, clarity, and texture have been left untouched, and will need to be adjusted to suit the photographic exposure. Unlike most film simulation lightroom presets, I have omitted the grain settings, for a cleaner, more contemporary look for digital photography.
Lightroom Preset Pack - Night Cityscapes
This Lightroom preset pack contains 6 of my most used night cityscape presets, plus a photoshop action and lightroom brush for use with the Cinestill 800T preset. Three of these presets are based on popular film stock colour science. These presets are intended for photographers shooting in RAW mode, and can work for both long exposure and handheld night photos. These presets will also work for smartphone .jpegs if the highlights and shadows sliders are moved closer to 0.

The Night Cityscape presets include:
Standard Cityscape SK_Standard_Cityscape.xmp - this preset is the most commonly used base preset I use for night cityscape photography. It has neutral tones, and uses a wide dynamic range.
Orange Cyan Cityscape SK_Orange_Cyan_Cityscape.xmp - the Orange Cyan preset is the most "extreme" preset in this pack, resulting in cinematic orange and cyan vibes. If you play around with the sliders in the calibration panel, you can also create a wide range of highly saturated cinematic and cyberpunk colour combinations.
Kodak Portra 400 Cityscape SK_Kodak_Portra400_Cityscape.xmp - Kodak Portra 400 inspired colour science works surprisingly well for Cityscapes, so I widened the dynamic range compared to most Portra 400 presets, making it useful for night cityscapes.
Cyanide Cityscape SK_Cyanide_Cityscape.xmp - the Cyanide preset adds cyan to highlights, but without adding a colour cast to the whole photo. This creates cool but subtle cyberpunk vibes.
Kodak Tri-X400 Cityscape SK_Kodak_Tri-X400_Cityscape.xmp - this preset simulates the classic monochrome Kodak Tri-X400 film, but with a wide dynamic range for night cityscapes.
Cinestill 800T preset SK_Cinestill800T_V2.xmp - this Lightroom preset is based on the modern film stock Cinestill 800T, which typically creates a green/cyan/teal vibe (depending on the white balance and ambient lighting). This preset took many hours of research to optimise, and personally I think it is one of the most accurate Cinestill 800T presets available. Cinestill 800T presets are popular for night cityscape photography, but also work well for moody night portraits.
I have set the preset exposure to values between +1 and +2 depending on the preset, and you will need to adjust this to suit your photographic exposure. White balance is also set to "As Shot" so you may need to adjust temperature and tint depending on your camera white balance settings (I always shoot using auto white balance).
Cinestill 800T (and other film types with the Rem-Jet layer removed such as Reflx Lab 400 and 800) are famous for the Red Halation effect around bright lights. Even the new Fuji X half camera has a Halation effects mode. I have included a Photoshop Action and Red Halation Lightroom Brush to recreate this effect:
Red Halation Photoshop Action SK_Cinestill_Red_Halation_V2.atn
Red Halation Lightroom Brush SK_Cinestill_Red_Halation_Brush.lrtemplate

To install the Red Halation Photoshop Action:
Launch the Photoshop application.
Open the Actions Panel: Go to Window > Actions to display the Actions panel.
Load Actions: Click the Actions panel flyout menu (the three horizontal lines in the top right corner) and select "Load Actions".
Locate the .atn file.
Select and Open: Double-click the .atn file to import the actions into the Actions panel.
Use the Actions: Your newly loaded actions will now appear in the Actions panel, ready to be used on your images.
To use the Red Halation Photoshop Action:
Go to Photo > Edit In > Edit in Adobe Photoshop.
Open the Actions Panel, select the action, and then click the play icon at the bottom of the dialogue box.
This will create a red glow around bright parts of the image.
It is possible to change any of the settings in the Action. For example, the Gaussian Blur works better if the radius is similar to the camera's megapixel count. Threshold adjusts the brightness threshold of the effect. Colours can also be adjusted (Blue Halations also look very cool).
To remove unwanted halation, select a brush (you may also need to select "subtract from mask"), and click on the parts of the image where you want to remove the halation. This may take 5-10 minutes of work.
Save the image back to Lightroom.
Whilst I recommend using the above Photoshop Action for adding the Red Halation, I have also created a Red Halation Brush for Lightroom Classic only. To install this brush, unzip the downloaded folder, and copy the .lrtemplate file to Lightroom Classic's template folder. On Windows, this is usually C:\Users\<username>\AppData\Roaming\Adobe\CameraRaw\Settings


Comments