The Art of Light Painting Photography - Post Processing
- Stephen Knight
- Jun 14, 2025
- 6 min read
Updated: Jun 14, 2025
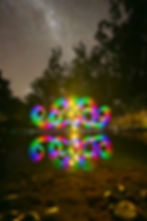
Previous tutorial articles have looked at how to create light painting photos. This article looks at how I post process light painting photos.

Optimal Camera Exposure
The most important step before you post process your photo is getting the exposure right in the first place. Shoot in RAW, at maximum resolution. Whilst in-camera JPEG processing engines have improved considerably during the last decade, you will get much more control of the final results if you shoot in RAW. Spending many years shooting JPEGs is one of the biggest regrets in my photography journey. It should be remembered that all photos are post processed. JPEGs are post processed according to manufacturer's JPEG engine algorithms, RAWs are post processed by the artist.
Make sure you manually focus correctly, as you cannot easily correct a blurry photo in post processing. For most use cases, use as bright a flashlight/torch and tool combination(s) as you can get away with so that you can use as low an ISO as possible. Try and use an aperture that will result in a sharp photo. This will depend upon the lens, but f/5.6 to f/11 is usually optimal. Thankfully most new lenses (including kit lens) are sharp enough throughout the whole aperture range. Much to the annoyance of other light painters, I always have Long Exposure Noise Reduction turned on. This increases the amount of time you have to wait for the photo to appear on the back of the camera, but gets rid of hot pixels most of the time, even during 30C+ Australian nights. I set White Balance to Auto, as Temperature/Tint can be adjusted in post processing. Use available in-camera tools to make sure the horizon is straight. If you intend on posting a portrait orientated photo to Instagram, compose the photo taking into the account the Instagram 3:4 aspect ratio limit (this was previously 4:5).
Most importantly, don't overexpose any element in your light painting (unless your are purposefully intending on doing that). Most cameras can show overexposed (clipped highlights) areas of the photo on the back of the camera. Pay attention to parts of light painting tools that are closer to the light source (e.g. the light source end of a lightsaber), as these are often overexposed. Additionally, zoom into the photo and check for any obviously overexposed areas. Checking the histogram after the exposure may help, but light paintings tend to defy the usual rules of using histograms. Review the exposure, and if over or underexposed, adjust your camera exposure (Aperture or ISO) and/or light source brightness as required.
RAW Post Processing
This section describes how I usually post process light painting photos in Adobe Lightroom Classic. I have tested most post processing applications and I only recommend Lightroom, Lightroom Classic, and Capture One. There is no right or wrong way to post process photos, this is just how I currently do it. Techniques may vary depending on the camera used and post processing software, so this advice cannot always be taken verbatim.
I also post process most of my night cityscape and urbex photos in the same way. Coloured light or cinematic portraits are a whole different ball game!
After importing the photos, I place them in Collections organised by month and year to keep things tidy. For light painting portrait sessions, I'll name them with the models name, month, and year. I will then review the photos in Library, and give 1 star rating to photos that will proceed to post processing. I then filter by 1 star ratings, and move into the Develop module.

Approximately 90% of my light painting photos are processed in a similar way, with some exceptions, usually light painting portraits. To make it easy for myself, I have saved my usual settings as Lightroom presets, and apply that preset when I start post processing each photo. This saves a lot of time. The list below shows my usual global settings:
Treatment: Colour
Profile: Adobe Colour
Temp/Tint: As Shot. The white balance will be adjusted as desired. Photos using lights with RGB colour mixing usually require adjustment, as RGB LED colour mixing often results in a very cool temperature with magenta tint.
Exposure: Increased as required (typically between 0 and +3)
Highlights: -70. Maximising dynamic range.
Shadows: +70. Maximising dynamic range.
Whites/Blacks: 0. I rarely need to touch this my current Canon R8. If adjustments are required, hold Alt+adjust slider with mouse until Black or White clipping is just starting to appear.
Texture: +35. I prefer to use Texture to add local contrast instead of Clarity and Dehaze.
Clarity: 0. Though I occasionally use +10 for light paintings in gritty urban/urbex settings.
Vibrance: +10.
Saturation: +10 (+25 for RGB lights).
Tone Curve: Point Curve - Medium Contrast. I rarely use Linear.
Sharpening: I use the default of Amount: 40; Radius: 1.0; Detail: 25; Masking: 0. I rarely change these.
Noise Reduction (Luminance): Luminance: 30; Detail: 50; Contrast: 0. For noisier photos where I need to use Luminance settings >50, I'll switch to using AI Denoise set at 70.
Noise Reduction (Color): Color: 25; Detail: 50; Smoothness: 50. If there are lots of coloured pixels in shadows, I switch to using AI denoise set at 70.
Lens Corrections: Set to apply default lens profile lens correction.

Additional global settings that I occasionally apply include:
Crop/Straighten - I will crop and straighten as required. For portrait orientated Instagram photos you need to crop to 3:4.
HSL - sometimes I may adjust Hue, Saturation, and Luminance if one colour is "not quite right".
Transform - it is very rare that i need to use this for light painting photos, though I use it often for Cityscapes.
Effects - I may occasionally add a post-crop vignette up to -20 depending on the composition.
Calibration - this can sometimes be more useful than HSL or Temperature/Tint to make global hue adjustments. Useful for getting a nice Cyan.
Local adjustments that I occasionally use include:
Brush - I sometimes use local adjustment settings to optimise the overall balance of the photo, including:
Dehaze - to reduce lens flare
Exposure - to brighten up darker parts of light trails.
Exposure, Soften Skin (Lite), Temp/Tint - to enhance models in light painting portraits. I use this when Select Subject (below) fails to isolate the model.
Remove - whilst I prefer not to add or remove pixels, sometimes it is useful to remove unavoidable blemishes such as the light painter's feet, unsightly paint splodges on tunnel floors, obscene graffiti in tunnels, and other things you just don't want in the photo. The generative AI remove tool in Lightroom is a big improvement over the previous functionality.
Select Subject - Exposure, Soften Skin (Lite), Temp/Tint - to enhance models skin tones in light painting portraits.

Organising and Exporting
When I am happy with a post processed photo, I increase the photos rating to 2 stars, and if further image selection is required I may use higher star ratings to narrow down the field. I'll export the photo separately for each purpose with the optimal resolution (e.g. social media, website, prints, sending to model). I don't apply any further processing on export, such as sharpening. I usually export with sRGB colour space, JPEG at 92 quality. For social media, I export at the optimal resolution for Instagram mobile app uploads which is 1,440px on the horizontal edge. Ignore DPI/PPI unless you are printing, as DPI is irrelevant for web use.
Composites, Double Exposures, and AI Generative Fill
Composite or layered images are where two or more photos are blended into the final image. This may be performed as an in-camera double exposure, or in post processing applications such as Photoshop. This can be useful for astro-photography where vastly different exposures may be required for the light painting and night sky. It can also be fun to add digital manipulation to light paintings in applications such as Photoshop (in particular adding blur layers). Whilst many light painters are anti-composites, it should be noted that most commercial light painting photographers use Photoshop in their post processing workflow.

In the last few years generative AI has become more popular. It can be used to change a background, or fill out a "too cropped" composition. It isn't my cup of tea, but I've seen some interesting creations by other artists. If you do use composite images or AI generative fill then I would highly recommend being honest in the image description on social media, and mention how the image was created. Exporting images created using AI functionality from Lightroom (non-Classic) and Photoshop may automatically add Content Credentials to the photo's metadata, flagging that AI was used during creation.
Conclusion
There is no right or wrong way to post process light painting photos. However, making use of digital sensor's wide dynamic range helps with optimising light paintings. Getting the exposure right in the first place will help considerably. Make use of RAW post processing to add that extra polish to your photo, and don't be afraid to use Photoshop if you want to add some creativity.
Help support this website by donating to: