.jpg)
The Art of Night Portraits
- Stephen Knight
- May 4, 2025
- 9 min read
Updated: Jun 4, 2025
This article takes a look at the art of creating night portrait photographs in outdoor locations. This covers camera settings, as well as lighting equipment and techniques that I have successfully used for night portraits. Six case studies explain how I illuminated various scenes with portable LED lighting, or used ambient light. Most of these photos break the rules of portrait photography - limited use of key lighting, and heavy use of ultra wide or wide angle lenses.


Camera settings.
Whilst many of my night portraits are long exposure light painting portraits, this article looks at night portraits using "normal" shutter speeds. A wide range of cameras can be used for night portraits. Full frame sensors with good high ISO performance are the most optimal, but good results are easily possible with APS-C and M43 cameras, as well as smart phones. The use of AI denoise in Lightroom has effectively added a few more stops of low light capability for cameras, and I have managed to get high quality results at up to ISO12800.
I would highly recommend using fast lenses to let in as much light as possible. f/1.8 (or faster) lens are optimal, but a f/2.8 lens is fast enough in most situations. I use between f/1.8 to f/2.8 depending on the depth of field required, and tend to prefer f/2.8 to keep more of the environment surrounding the model in focus.
In low light situations, I prefer to use shutter speeds at the slower end for portrait photography. I have found that 1/80 second is optimal to avoid model movement unsharpness whilst letting enough light onto the sensor. This does however require the model to hold poses and shoot in bursts, rather than continuous movement and shooting. You will need to communicate this requirement to the model.
As I use a fixed aperture and shutter speed, then the variable setting needs to be ISO. Different camera manufacturers may use different ways of achieving this, but on my Canon R8 it is simply performed by using manual mode, setting the aperture and shutter speed, and using auto ISO. Sometimes I may need to add negative exposure compensation depending on the lighting. I have saved my usual night portrait settings as custom modes. Focus settings use continuous autofocus with eye tracking. If your camera or lens have image stabilisation, have it turned on.
I personally don't use any optical lens filters, but the use of effects filters can enhance many night portraits if that's your style.
Lighting equipment and settings
This article concentrates on portable battery powered continuous lighting. Yes, it is possible to use flash/strobe units, but it limits creative opportunities compared to highly flexible continuous lighting. In the last few years continuous lighting has evolved enough that "bright enough" lights with internal batteries are easily portable. Most of these lights are bi-color (adjustable white light CCT), or RGBWW/RGBCW with adjustable CCT and RGB colour mixing. Types of continuous lights include:
Pocket LED panel lights - most portable option.
COB video lights - brightest portable option.
LED tube lights - good portable alternative in a set.
Other LED light types - sticks, wands, soft LED panels, larger LED panels, torches/flashlights.
Of course, you can just use ambient lighting, but if the lighting is dim, you may need to use a very high ISO.
Portability Practicalities
The choice of light will depend on how you want to light the scene, and portability. Personally I use a combination of a single COB video light, and multiple LED panel lights. My lighting choice is somewhat dictated by using lights that I can also use for long exposure light painting. I know many other photographers who successfully use LED tube lights for night photography.
These lights can all be tripod/light stand mounted, or handheld. Many LED Panel Lights include mini tripods as an accessory. Some LED Panel Lights such as the Aputure MC Pro can magnetically attach to surfaces, or use a magnetic ball head for fine positioning. LED panel lights can also be mounted on the cold shoe of cameras, but will generally only work for longer focal lengths such as >50mm, as the lens blocks the light angle at wider focal lengths. I rarely use this mounting option.


I currently use the SmallRig RC 60C, three Aputure MC Pro, and one Amaran Ace 25c for night portraits.
Lighting Techniques
Lighting settings that need to be considered:
Brightness - adjust the brightness to the scene with consideration to balance with the ambient/background lighting and other lights used. I often use a primary/key light at less than 40% output.
Inverse Square Law - this is related to brightness. If the distance between a light source and object (in this case a model) is doubled, the brightness that object is illuminated by (in lux) is decreased x4. This is critical when placing lights.
Correlated Colour Temperature (CCT) - adjusts how warm or cool the white light is. By default, I use daylight 5600K, but will adjust to the scene.
Green/Magenta Tint - adjusts the white light tint between green to magenta. By default this is set to zero. This is only available on RGBWW/RGBCW lights as it requires the use of RGB LEDs.
Hue/Saturation/Intensity (HSI) - these settings are used to control coloured lighting. Hue affects the colour, and works in degrees, with Red being 0 degrees, Green at 120 degrees, and Blue at 240 degrees. Most RGBWW/RGBCW lights allow for 1 degree increments or better. Saturation affects how much white light is added to the colour mix. The biggest mistake I see with coloured light portraits is use of 100% saturation, resulting in over-saturated / blown out highlights on the model's skin. I very rarely use 100% saturation, preferring to use 90% or below. This creates a more "Gel like" look, allowing the models facial structure to still be defined. Some lights may also have a CCT adjustment setting for the white light used in HSI mode. Intensity is the same as brightness. Be aware that LEDs have varying efficiencies at different Hues, so matching "cyberpunk" Pink and Cyan lighting may require vastly different Intensity settings.
Colour Rendering Index (CRI) - the CRI affects how well colours are rendered when illuminated. The closer to 100 the better. Most consumer flashlights are 70CRI, and LED light bulbs 80-90CRI. Thankfully most portable photography and video lights are now >95CRI.
Gel or Source Modes - some LED lights have Gel or Lighting Source modes. The Aputure MC Pro being an excellent example of both. Gel modes can be very useful for matching multiple lights, or rapidly selecting a setting. CTO or CTB Gels settings can be used for matching warm or cool light. Source modes can mimic a wide range of lighting types.
Light Softness - this is an area where compromises are required for portability. The larger the light source, the softer the light (less harsh shadows), which is generally more flattering for the model's skin. My preferred option for softer light is using a COB video light with a 30cm mini-softbox. However, in many situations I need to compromise and use a smaller pocket LED panel light instead. A full size 60cm or 90cm softbox or beauty dish will provide noticeably softer light, but these aren't particularly portable. Tube lights are portable and will provide soft light, but only in one plane. Torches/flashlights will provide the harshest light, and should thus be avoided for primary/key lighting. Thankfully, Lightroom has good soften skin brushes for counteracting the effect of harsh lighting sources.
Beam Shaping - there are situations where the photographer may want to control the directivity or spread of light. Options to limit the beam spread include COB video lights with reflectors (which will also significantly increase brightness), LED panels with grids or barn doors, or mini soft-boxes with diffusers and grids (you have to use a diffuser when using a grid with soft boxes). If you want to spread out the light more (bearing in mind most of these lights are already quite floody), then you can use diffusers.
Case Studies
.
Backlighting on a Bridge

For this photo, I backlit the model using a SmallRig RC 60B COB video light with reflector placed on a tripod. Use of a COB video light with reflector allows for very high brightness/illuminance from a portable light. The CCT was set at a cooler 6500K. So that the model wasn't in silhouette, I used an Aputure MC Pro LED panel light, also mounted on a tripod, for front fill lighting set at a warmer 4500K CCT. I used a grid to control the light spread. As the MC Pro is nowhere near as bright as the RC 60B, then this purposefully allowed the backlight to dominate and create shadows. Two more MC Pros with diffusers were placed in the background, facing away from the camera. These were set to a Lee Full CTB gel mode, for even cooler light than the already cool backlight. AI denoise was required in Lightroom as I had to push the shadows in post processing.
f/2.8, 1/80sec, ISO2000. 24mm focal length.
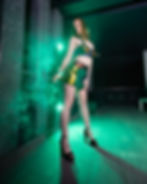
Abandoned Hut Silhouette

The lighting for this photo was designed to silhouette the model. I used two Aputure MC Pros for the backlighting, set on Electroluminescent source mode (a green-ish hue with low saturation). A portable battery powered smoke machine was used for the haze. No front lighting was used to maximise the silhouette effect. The subtle background lighting used a single Aputure MC Pro with dome diffuser, with a purple hue and low saturation. If I had owned a RGBWW COB video light at the time of this photo, I would have have used that instead to increase the background brightness.
f/2.8, 1/80sec, ISO1600. 16mm focal length.
Fire Escape Portrait

This portrait was created on a fire escape, with ambient fluorescent lighting. Whilst I took some moody portraits just using the fluorescent light, adding colour really added to the scene. The fluorescent light was used for primary/key lighting. As it was above and in-front of the model, it only worked well when the model was looking slightly upwards (otherwise shadows were cast around the eyes). Red fill lighting was provided from an Aputure MC Pro with dome diffuser, strategically attached by its magnets to the stairway. A second Aputure MC Pro was used for blue backlighting.
f/2.8, 1/80secs, ISO1000. 16mm focal length.
Gobo Projection Portrait
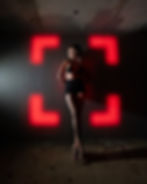
This portrait used just 2 lights. The red projection was created using the SmallRig RF 10C videolight with a gobo filter. The side lighting was created using an Aputure MC Pro placed on a tripod. This was fitted with the light control grid and angled slightly away from the wall to limit the light projected onto the wall, whilst still illuminating the model. Whilst this photo required ISO12800, as it was correctly exposed and required minimal post processing, I didn't need to use AI denoise.
f/2.8, 1/80sec, ISO12800. 16mm focal length.
Balcony Portrait
This photo was created on an apartment building balcony, and is the only photo in this article which used a proper key light. In this case, the key light was a Amaran Ace 25c panel light with diffuser, mounted on a tripod. Three Aputure MC Pro lights with flat diffusers were used for backlighting, attached to a metal support column with their magnets. A portable smoke machine was used to add the haze. A 16mm ultra-wide angle lens was used. These do distort the models features (particularly the closer they are to the edge of the field of view), and can be hit and miss. However, models never complain about the distorted long legs!
f/2.8, 1/80sec, ISO2000. 16mm focal length.
Train Station Portrait

This photo was taken in a suburban train station, with the aim of post processing in a Cinestill 800T film style. Only the ambient fluorescent lighting was used. As the lighting is only from above, and central to the bridge, this created many shadows, most noticeable to the models legs. In hindsight, maybe I should have added a front fill light. But on the other hand, the shadows add mood, and setting up a tripod with lights in a train station may not be permitted.
I used a Cinestill 800T Lightroom preset which I have developed (and sell in my store), and Photoshop action to add the red halation effect for which Cinestill 800T film is famous for.
f/2.8, 1/80sec, ISO1000. 50mm focal length.
Post Processing
After light painting, you will need to post process your photos. I use a mixture of global and local adjustments (including subject masking) in Lightroom. I usually post process one photo in each batch, and then copy/paste the settings across to similar photos, followed by individual tweaks to each photo. I occasionally use AI denoise in Lightroom for very high ISO portraits, or where I've had to push the exposure and/or shadows in post processing. I have created some useful Lightroom presets for various genres of photography.
I hope this article has been useful and inspiring!
Other Links
Help support this website by donating to: