.jpg)
Review: Thermal Master P1 Thermal Camera
- Stephen Knight
- Apr 6
- 5 min read
The Thermal Master P1 (Repair Master) is a budget priced thermal camera that plugs into iOS or Android smart phones, or PCs via USB-C. This is the first time I've tested a thermal camera, which I intend for use around the house, for flashlight reviews, and other geeky uses.
Disclaimer
The Thermal Master P1 was purchased with my own funds. Links are affiliate links.
10% off: THERMALBF10

Design and Construction
The Thermal Master P1 is a compact, thermal camera which connects to smart phones (both iOS and Android) directly via USB-C. There is a Lightning adapter version available for older iPhones. This USB dongle design uses the smart phone for both control and display, using the Temp Master app. It can also connect to PCs using a USB-C cable. It is one of the lowest priced thermal cameras on the market, at around US$120-130.
The Thermal Master P1 is primarily designed as a thermal inspection tool for repair and diagnostic tasks. These include electrical inspection, HVAC maintenance, auto mechanics, water pipe leakage, and energy/heat lost inspection. Specifications are:
384x240 pixels Super IR Resolution (X³IR), enhanced from a 160x120 VOx sensor.
Sensitivity <40mK, 25Hz) with 0.32W power use.
-20C to 600C (-4F to 1112F) measurements with +/-2C accuracy.
15 modes with isotherm, IQ+ precision, and adjustable emissivity.
Dimensions 59×27×17.2mm.
Weight 17.6g.
Camera FOV 52°×39° (equivalent to 37mm on a full frame camera).
Fixed focus (infinity).
The P1 arrived in a branded box, with a carrying case, the P1, a USB-C to USB-C extension cable, and quick start guide.
Despite the low cost and plastic construction, the build quality is pretty decent. The Thermal Master P1 powers itself from the phone's battery via USB-C. Unfortunately, as I have a thick rugged phone case, I couldn't plug in the USB-C, so had to use the extension cord. I will have to purchase a small USB-C to USB-C adapter so that I don't have to use 2 hands. You should get a few hours' worth of use, but it would be advisable to make sure your phone is well charged before use.

User Interface
I tested the Thermal Master P1 connected to a Google Pixel 10 Pro. User interface features in the Temp Master app include:
Toggle between standard and X³IR resolution.
Temperature Range -Auto, 20C to 150C, or 150C to 450C.
Toggle between Centigrade and Fahrenheit.
Point-Line-Area (rectangle or circle) thermal analysis.
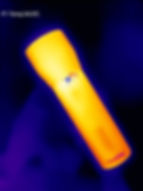
12 Colour palette choices - White Hot, Black Hot, Iron Red (my favourite), Red Hot, Rainbow, Jungle, Aurora, City, Low Light, Gold, Lava, Medical.
High/Low temperature alert settings - High temp alarm (adjustable temp), low temp alarm (adjustable temp), audible alarm, and vibration alarm.
Temperature Corrections (including custom modes) for Ambient Temp, Distance, and Emissivity.
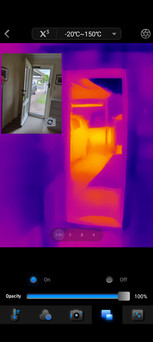
Opacity - displays the smart phones visible light image as a Picture in Picture.
Camera - Brightness, Contrast, Scale, Mirror, and Rotate (90 degree increments). 15X digital zoom.
Camera - Photo or Video. Ability to manage the Gallery (Edit, Add Report).
Calibrate (this also occurs automatically every so often, making a clicking noise).
I had no problems installing the app from Google Play, and connecting the P1 was very simple.
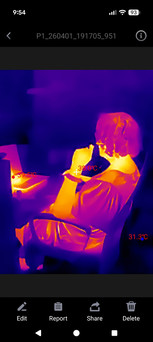
The app was easy to use, with an excellent range of functionality. I really like range of 12 different colour palette options, of which I've tried to use a wide range of in this review.
Adding/removing measurements and changing colour palette can be made in the app retrospectively, so the image must contain metadata. The app generally worked well. I did find that if you want to remove all measurements before taking photos (so that you don't have to retrospectively remove them in the Gallery) you have to click Delete in the measurements section.


Screenshots of the Temp Master app user interface (click to enlarge).
Camera and Image Quality
As this is the first thermal camera I've tested, I'm not able to make any direct comparisons against other thermal cameras. However, multiple YouTube videos show that despite the relatively low resolution sensor, that the image quality is very impressive for this market segment and outperforms more expensive FLIR thermal cameras.
The camera has a resolution of 160x120 from its Vox sensor, enhanced to 384x240 pixels when Super IR Resolution (X³IR) is enabled. The X³IR interpolation using the RazorX ultra-clear algorithm does makes a noticeable improvement to the image quality, notably improved resolution and edge enhancement. There were a few tests where wires (such as aerial electrical and phone wires) caused image artifact when X³IR was active due to "overactive" edge enhancement. In these rare cases, I would turn the X³IR off.
I sometimes encountered an intermittent brighter area on one side of the image (side will depend on orientation) which I assume is either a signal chain or image processing artifact. This can be seen in some of the sample photos later in the review. This seemed to occur more often when outside, and appears to be coming from the side of sensor closer to the camera's PCB (medial side). Clicking the calibration (shutter icon) button usually resolved this.
The frame rate of 25Hz is good enough for most uses, and the camera functionality, including start up time is snappy. The field of view is similar to a 37mm full frame lens, which seems to be a good compromise for indoor and outdoor use.
The lens is fixed focus (infinity), and will focus on most objects other than very close macro use such as for inspecting very small components on printed circuit boards (PCBs). The more expensive, higher sensitivity, and higher resolution (256x192 / 512x384 X³IR) Thermal Master P3 which has a focusable lens would be better for macro uses. The P3 does however have a much narrower field of view roughly equivalent to a 60mm full frame lens. The slightly more expensive Thermal Master P2 Pro has the higher resolution, with fixed focus, clip on macro lens, and a similar field of view to the P1. The top of the line Thermal Master P4 has a dual-lens thermal and visible light camera configuration.
Despite the 384x240 image matrix in X³IR mode, the photos are saved to my camera roll as 1080x1440 (when orientated in default portrait mode). I'd prefer the option of saving in original resolution and perform my own upscaling in post processing applications with advanced upscaling algorithms, but this may be a niche requirement. Video is saved at 540x720.


Conclusion
Positives:
Good value for money.
Good image quality for the price.
Useful camera field angle.
Easy to use app.
Excellent app functionality.
iOS and Android compatible.
Negatives:
Intermittent image artifacts (brighter on one side of the image, usually resolved by calibration button).
Limited macro functionality - see P2 Pro or P3 instead.
Unable to connect to smart phones with thick/rugged cases without using the extension cable.
No option to save photos without upscaling to 1080x1440.
Overall, the Thermal Master P1 is a fantastic consumer orientated product with an excellent price to performance ratio. It is a fascinating device to use. The app is easy to use, with an impressive range of measuring features and colour modes. Despite a relatively low resolution sensor, the image quality (particularly in X³IR mode) is good enough for most consumer and some semi-professional use cases.
10% off: THERMALBF10
Thermal Master P1 Product Link. Great value for money consumer choice.
Thermal Master P2 Pro. Higher resolution and clip on macro lens.
Thermal Master P3. Higher resolution and sensitivity, focusable macro lens, higher, narrower field of view.
Amazon P4. Dual-lens thermal and visible light camera.
Help support this website by donating to: